- 浏览: 203487 次
- 性别:

- 来自: 杭州
-

文章分类
最新评论
-
落叶知秋__:
indexPath能用?
UITableView 删除特定的CELL -
xhanxhanxhan:
Hooopo 写道puts 返回结果是nilnil and r ...
一个脚本×关键词“百度说吧”你懂的 -
Hooopo:
puts 返回结果是nilnil and return 这个是 ...
一个脚本×关键词“百度说吧”你懂的 -
nono123:
谢谢!
不用信用卡而申請其他地區itunes賬號的方法 -
BarryWei:
lordhong 写道多谢分享, 学习一下, iPhone我都 ...
永远的扫雷英雄(开源)
COOOOL !
Developing Cocoa Applications
Using MacRuby
Ruby is a dynamic programming language that, over the last few years, has enjoyed enormous popularity, thanks in part to the Rails web framework. Now with MacRuby, you can create Mac OS X applications with Ruby while maintaining the peformance benefits of a fully fledged Cocoa application. This article will show you how to get started with MacRuby and build your first sample application.
Common Ancestry
While Objective-C is the de-facto programming language for writing applications on Mac OS X Leopard, Ruby is also supported as a Cocoa development language via the RubyCocoa bridge. In fact, Ruby and Objective-C share a common ancestor in Smalltalk, making them ideally suited for integration. This is evident in the popularity of RubyCocoa, which has served as the basis for several significant projects including the open source LimeChat IRC client, the commercial blogging application Blogo , and even Apple’s own Podcast Producer technology.
Why MacRuby?
Creating a bridge between two languages can be complex and come with certain costs in performance and true integration. Apple's open source project called MacRuby aims to address these problems.
RubyCocoa is implemented as a bridge between the Objective-C runtime and the official Ruby interpreter. Because of this, the bridge must be crossed every time you talk to an Objective-C object from Ruby, and vice-versa. All objects must be converted from one typing system to another and messages must be forwarded, the cost for which can be prohibitive if done too often.
The goal of the MacRuby project is to address these and a number of other challenges by providing an implementation of the Ruby language on top of core Mac OS X technologies such as Objective-C runtime, the generational garbage collector, and CoreFoundation .
In MacRuby, all classes are Objective-C classes, all methods are Objective-C methods and all objects are Objective-C objects. In essence, the bridge disappears. Ruby is implemented directly on top of the Objective-C runtime.
More specifically, MacRuby’s fundamental data types such as String, Array, and Hash are re-implemented on top of their CoreFoundation counterparts (CFString, CFArray and CFDictionary, respectively). All strings created in MacRuby are native Cocoa strings and can be passed to underlying C or Objective-C APIs that expect a Cocoa object, no conversion occurs. This implementation detail also implies that strings in MacRuby are UTF -16 compliant by default.
MacRuby is also re-entrant, meaning it can be called into from multiple threads safely. Threads created in MacRuby are always native threads.
Finally, MacRuby uses the Objective-C garbage collector to reclaim unused memory. The advantages of the Objective-C collector are two-fold: First, its generational nature performs fast collections, and second, it doesn’t interrupt the current process while collecting memory as all collections are done in a separate thread.
Getting Started
The easiest way to install MacRuby is to download one of the binary installers. You can also retrieve the sources from the source repository and build them manually. The Installing MacRuby page will guide you through the process of getting MacRuby installed on your machine.
MacRuby installs itself as a framework
in /Library/Frameworks/MacRuby.framework
. The whole project is self-contained there, making very easy to bundle MacRuby with your application.
MacRuby comes with Xcode and Interface Builder support (see below), and also several code examples in /Developer/Examples/Ruby/MacRuby
.
Executables are exported in /usr/local/bin
as symbolic
links and they all start with the “mac” prefix with the only
exception of hotcocoa
. Here are some of the command line utilities.
|
the interpreter |
|
the interactive shell |
|
the documentation viewer |
|
the documentation generator |
|
the RubyGems package manager |
Let’s start by launching the interactive shell from the terminal.
$ /usr/local/bin/macirb
>>
NOTE
: you can type macirb
directly if /usr/local/bin
is in your $PATH
.
NOTE
: the /usr/local
prefix is temporary.
We will use this shell for the following section.
Discovering the MacRuby World
Given that MacRuby is an implementation of the Ruby language, everything that works in "standard Ruby" should also work with MacRuby. Basic tasks like array manipulation and string processing or even advanced tasks like regular expressions and adding singleton methods to an object should "just work."
For example, we can concatenate two strings:
>> x = 'foo' + 'bar'
=> "foobar"
>> x.length
=> 6
Here is what happens if we ask for the class of a string.
>> x.class
=> NSMutableString
A string in MacRuby is an instance of the NSMutableString class, which represents as its name indicates a string whose content is allowed to mutate.
This means that we can call any method defined on NSMutableString (or NSString
, which is the non-mutable superclass). For instance, let’s call uppercaseString
which is similar to the Ruby upcase
method.
>> x.uppercaseString
=> "FOOBAR"
>> x.upcase
=> "FOOBAR"
It is also possible to build string objects by using the Objective-C interface.
>> NSString.string
=> ""
>> NSString.stringWithString('foo')
=> "foo"
>> NSString.alloc.initWithString('foo')
=> "foo"
NSString has a pathWithComponents:
class method which accepts an NSArray
object and returns a new string built from the strings in the array by
concatenating them with a path separator between each pair. This method
is similar to the File.join
Ruby method. To call it from
MacRuby, we can simply pass a Ruby array as the argument, because in
MacRuby all arrays are Cocoa arrays.
>> NSString.pathWithComponents(['Users', 'home', 'luke'])
=> "Users/home/luke"
>> File.join('Users', 'home', 'luke')
=> "Users/home/luke"
NSMutableString indirectly inherits of NSObject
, the root class of all Cocoa objects. We can therefore also call an NSObject method on a string, for example performSelector:
,
which sends the given message to the receiver object (in Objective-C,
messages are called selectors). This method is basically doing the same
as the Ruby send
method.
>> NSMutableString.ancestors
=> [NSMutableString, NSString, Comparable, NSObject, Kernel]
>> x.performSelector(:uppercaseString)
=> "FOOBAR"
>> x.send(:uppercaseString)
=> "FOOBAR"
In fact, in MacRuby, classes are always subclasses of NSObject.
>> class Foo; end
=> nil
>> Foo.ancestors
=> [Foo, NSObject, Kernel]
Unless you are new to Ruby, you probably noticed that the Object class is not in the ancestor chain anymore here, contrary to the official Ruby implementation. This is because in MacRuby, Object does not exist anymore as a class—rather, it is just an alias (or shortcut) to NSObject. Methods that are implemented in Object in the standard Ruby are available in NSObject in MacRuby.
The same is true for String, Array and Hash, which are actually in MacRuby aliases to NSMutableString, NSMutableArray and NSMutableDictionary.
>> Object
=> NSObject
>> String
=> NSMutableString
>> Array
=> NSMutableArray
>> Hash
=> NSMutableDictionary
By default, Ruby methods such as Class#instance_methods
or Object#methods
,
which return a list of methods a given class or object respond to, do
not include Objective-C methods. To get them, you need to pass the
second parameter as true, as illustrated as below.
>> Foo.instance_methods(true, true)
=> [..., :performSelector:withObject:withObject:, :performSelector:withObject:,
    :performSelector, ...]
In this list you probably just saw some curious method names, such as :performSelector:withObject:withObject:
, which definitely does not look like a genuine Ruby method. Let’s examine this in the following chapter.
Dealing with Objective-C
Objective-C methods are different from Ruby methods in the way arguments can have names (or keys) and that these names form the whole method name at the end.
As an example, the following NSObject method is declared as the following in the NSObject.h
header file.
- (id)performSelector:(SEL)aSelector withObject:(id)anObject withObject:(id)anotherObject
The method name, or selector, is performSelector:withObject:withObject:
.
It is determined by concatenating every sub-part of the method
signature. As you can see, argument names are not necessarily unique
(here, withObject
is reused twice). You can learn more about this syntax in the Objective-C Messaging
chapter of the Objective-C manual.
Calling this method from Objective-C is done like this.
[myObject performSelector:sel withObject:obj1 withObject:obj2];
Using the RubyCocoa bridge, you would have to write the following.
>> myObject.performSelector_withObject_withObject(sel, obj1, obj2)
However, in MacRuby, we extended the syntax to support Objective-C messaging, so you can do the more natural thing:
>> myObject.performSelector sel, withObject:obj1, withObject:obj2
Let’s take another example and try to call the setObject:forKey:
method of the NSMutableDictionary
class, which is as previously mentioned the class of every Hash object in MacRuby. This method can be seen as an alias to #[]=
and here is its Objective-C prototype.
- setObject:(id)anObject forKey:(id)aKey
We can call it from MacRuby like this.
>> h = {}
=> {}
>> h.class
=> NSMutableDictionary
>> h.setObject 'foo', forKey:42
=> nil
>> h
=> {42=>"foo"}
MacRuby also supports another syntax, which uses key-value Hash pairs, and may look more familiar to the reader familiarized with Rails.
>> h.setObject 'bar', :forKey => 43
=> nil
>> h
=> {42=>"foo", 43=>"bar"}
We now know how to send Objective-C messages, but what about defining them?
It is a very common task in Cocoa to have to implement protocols . A protocol in Objective-C can be seen as a list of messages, similar to the notion of an interface in Java, as a contract that you are supposed to conform to. Formal protocols require you to implement all the methods in the list, while informal protocols does not enforce any implementation.
For example, a table view (NSTableView ) object has a data source attribute which can be set to any object. The data source object is supposed to hold the data and give it to the view at demand. To implement this functionality, the data source object is required to conform to the NSTableDataSource informal protocol and to implement at least the following two methods:
// Returns the number of records managed for aTableView by the data source object.
- (NSInteger)numberOfRowsInTableView:(NSTableView *)aTableView

// Invoked by the table view to return the data object associated with the specified row and
// column.
- (id)tableView:(NSTableView *)aTableView
      objectValueForTableColumn:(NSTableColumn *)aTableColumn
      row:(NSInteger)rowIndex
These methods can be implemented in MacRuby as follows, using a syntax similar as the calling one.
class MyDataSource
  def numberOfRowsInTableView(view)
    # Return the number of items.
  end

  def tableView(view, objectValueForTableColumn:column, row:index)
    # Return the value at the given row/column position.
  end
end
The careful reader will notice that the first method, numberOfRowsInTableView:
, is supposed to return a NSInteger
type. This type is actually a C integer. How can you return a C integer from Ruby?
Easy enough: MacRuby will convert Ruby Fixnum objects to C integers
for you, fast enough to not even be noticeable. So you can safely
return a Ruby integer out of the numberOfRowsInTableView:
method, but you can also pass a Ruby integer to a Cocoa method that
expects a C integer. This point is valid for other types too such as C
booleans, floats, and more.
The second method, tableView:objectValueForTableColumn:row:
, is expected to return an id
type. In Objective-C, id
is a generic type that can refer to any arbitrary object. This means
that in this method you can return any object. In practice and by
default, the table view will only handle a few object types, like
strings and numbers for example. It is nevertheless possible to
customize the table view so that it can accept more complex objects,
but this goes out of the scope of this article.
So, we could implement the informal protocol described above using a simple array object as the data model.
class MyDataSource
  def initialize
    @data = ['one', 'two', 'three', 'four', 'five']
  end

  def numberOfRowsInTableView(view)
    @data.size
  end

  def tableView(view, objectValueForTableColumn:column, row:index)
    # Here we assume that this table view has only one column, so the
    # column parameter is simply ignored.
    @data[index]
  end
end
As you could see in this section it is fairly easy to send and implement Objective-C selectors in MacRuby. We now know enough of the basics to start writing our first Cocoa application with MacRuby!
Creating a New Project
In this section, we will put together an application to manage our friends. This will be a very simple program, the purpose of which is just to get your feet wet and leave enough room for further improvements. Here is what the application will look like at the end (Figure 1):
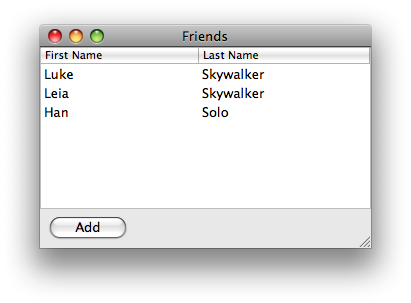
Figure 1: Friends.app
MacRuby comes with a project template for Xcode , Apple’s IDE . To use it, you must have Xcode installed on your machine. Xcode does not come by default with Mac OS X, but it can be found on the Mac OS X DVD . For more information, refer to the Xcode Installation Guide .
NOTE : If you have to install Xcode, make sure to re-install MacRuby after, so that the project template can be taken into account.
Start Xcode, then click on the “File” menu item, then “New Project” and select “MacRuby Application” in the list (Figure 2). Do not select one of the “Cocoa-Ruby” items, these are for RubyCocoa and here we want to use MacRuby.
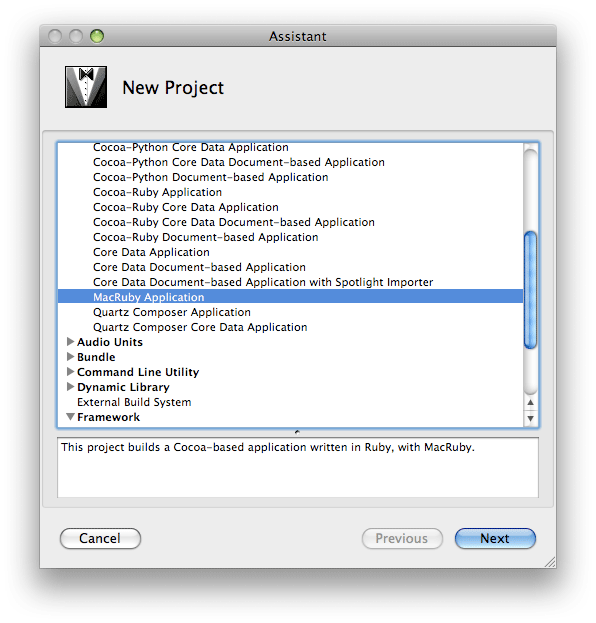
Figure 2: New Project
Then click “Next” and provide a name for the new project. We will call it “Friends” (Figure 3):
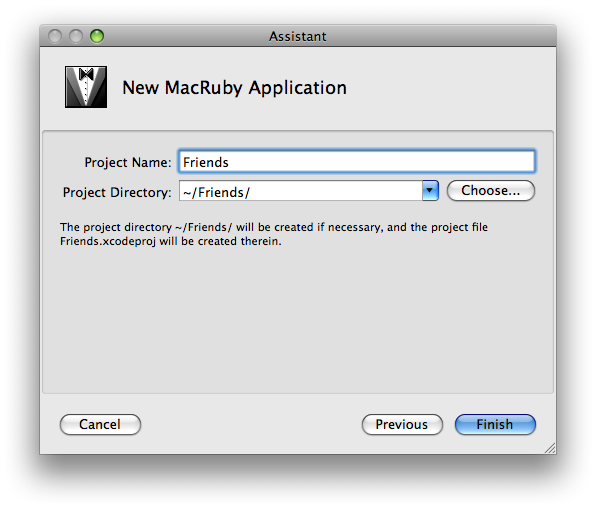
Figure 3: New MacRuby Application
Once you hit the “Finish” button, Xcode will generate a new MacRuby project for you. Let’s have a look at what has been generated:
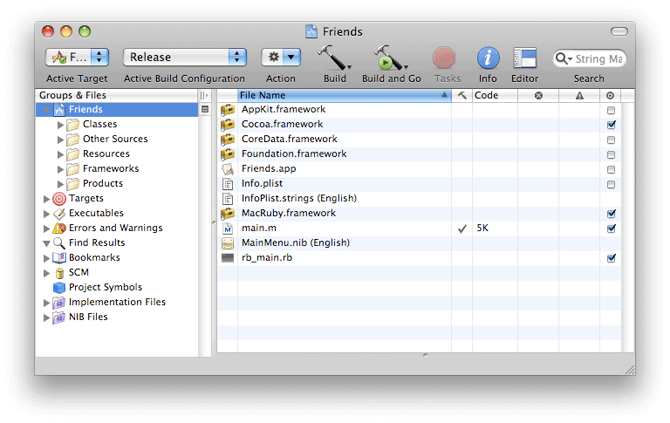
Figure 4: The Friends Project
main.m
contains the “main” C entry point of the
application. If you read its source code you will see that what it does
is very simple: it just calls the macruby_main
function, passing the rb_main.rb
file name and the arguments received from the command line. This
function is part of the MacRuby framework, it will initialize the
MacRuby runtime based on the given arguments, then execute the given
Ruby script at the end, in this case, rb_main.rb
. You rarely will need to modify this file.
#import <MacRuby/MacRuby.h>

int main(int argc, char *argv[])
{
    return macruby_main("rb_main.rb", argc, argv);
}
rb_main.rb
is also not very complicated. First it loads the Cocoa framework, using Kernel#framework
,
a method that MacRuby defines to load dynamic bundles at runtime. This
makes sure all that Cocoa APIs are available in MacRuby, including
non-introspectable APIs thanks to the BridgeSupport
technology. Then, it locates all the Ruby files inside the application bundle and requires them. Finally, it calls NSApplicationMain
, which is a C function defined in Cocoa that starts the main Cocoa run loop.
# Loading the Cocoa framework. If you need to load more frameworks, you can
# do that here too.
framework 'Cocoa'

# Loading all the Ruby project files.
dir_path = NSBundle.mainBundle.resourcePath.fileSystemRepresentation
Dir.entries(dir_path).each do |path|
  if path != File.basename(__FILE__) and path[-3..-1] == '.rb'
    require(path)
  end
end

# Starting the Cocoa main loop.
NSApplicationMain(0, nil)
MainMenu.nib is the file that describes the user interface. This file can be edited using Interface Builder , a separate application that works very closely with Xcode.
If you hit the “Build and Go” button in the toolbar, you see an empty window appear:
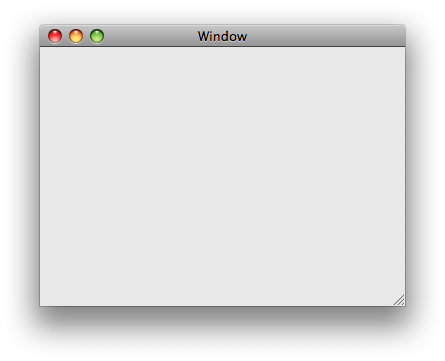
Figure 5: Friends.app Running
A blank window is fine to see that things are working, but let’s add some actual interface elements. You can double-click on the MainMenu.nib file and Interface Builder should appear:
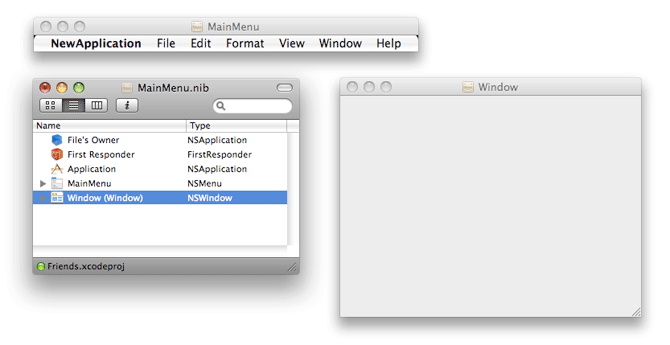
Figure 6: MainMenu.nib
We have a menu and an empty window there. Adding new user interface elements to the window can be done by using the Library panel. To bring it, you can click on the “Tools” menu item, then “Library”.
You will see that it shows a rich collection of various user interface elements. Let’s try an NSTableView . If you do not find it in the list, you can use the filter field at the bottom of the panel, as shown in Figure 7:
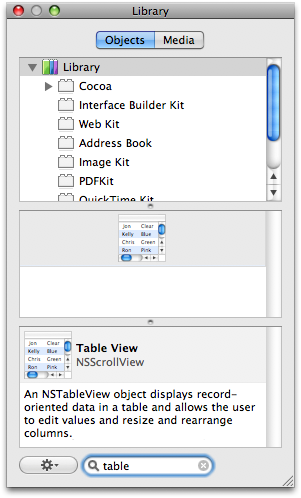
Figure 7: Interface Builder Library
To bring the table view in our window we use a simple drag-and-drop operation. Just drag the table view from the Library panel into the empty window. Make sure the table view properly fits in the window:
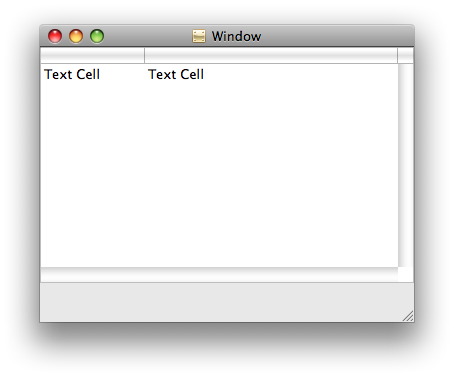
Figure 8: The Window and Table View
Let’s now configure our table. In the MainMenu.nib window, just expand the Window tree item to navigate in the window’s sub-views and find the table view item. You will see that there are two NSTableColumn objects under the table view. Click on the first one and bring the Inspector panel, by clicking on the “Tools” menu item, then “Inspector”. Then, in the Inspector, change the Title field to “First Name” and the Identifier field to “first_name”, as shown in Figure 9:
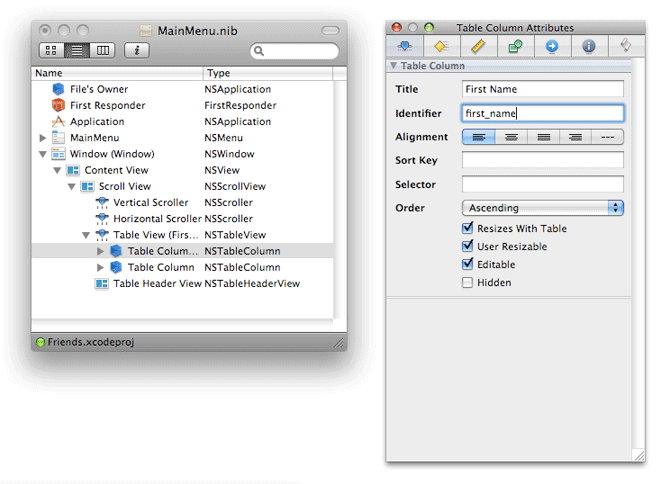
Figure 9: Inspecting the Table Columns
Repeat the same operation for the second table column, this time using “Last Name” for title and “last_name” for identifier, and your window should look like:
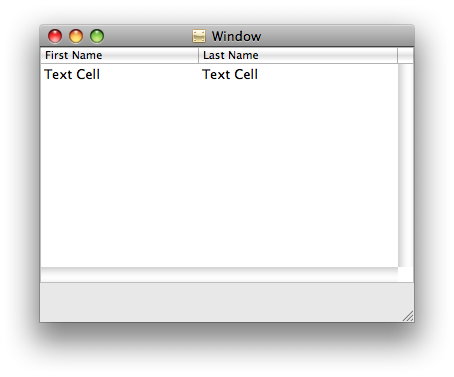
Figure 10: The Window and Table Columns
Now, in the views tree, you will see that the superview of the table view is a scroll view (NSScrollView ) object. This special view, which embeds scrollers, is automatically built when you create a table view in Interface Builder. Click on it and in the Inspector, check the “Automatically Hide Scrollers” button. We do not want the scrollers to appear unless we really have more data that we cannot display!
Then, still in the Inspector, click on the third tab and configure the “Autosizing” settings as shown in Figure 11:
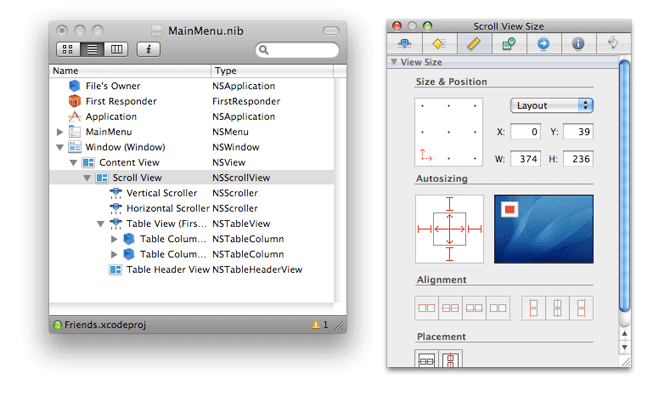
Figure 11: Inspecting the Scroll View
This will make sure that the view is appropriately expanded when the window is resized.
Let’s create a button at the bottom of the window, and name it “Add”. You should know how to do this now, by dragging an NSButton object from the Library panel into the window. Then, in the Inspector, do not forget to set the “Autosizing” settings as shown in Figure 12, so that the button is linked to the left and bottom borders and will stick to them when the window is resized.
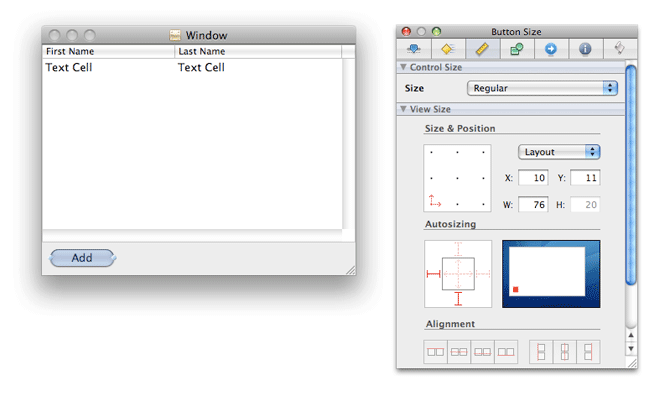
Figure 12: Inspecting the Button
As you may see, our window’s title is “Window”, which is not very serious. Let’s fix this. In the MainMenu.nib window, select the Window object, then open the Inspector and change the “Title” field to “Friends”.
Now our interface is done You can test it by clicking on the “File” menu item, then “Simulate Interface”. This will run the interface through the Interface Builder simulator. Obviously it is not going to behave as expected, clicking on the Add button will not do anything and the table view will remain empty. But you can verify at least that the user interface elements are there and that everything just work when the window is resized.
All we have to do now is to write the Ruby code!
Let’s go back to Xcode and click on the “File” menu item, then “New File”, select “Empty File in Project”, name it “Controller.rb”, then click “Finish”. You should have an empty Controller.rb file in your project.
We are going to define a class that will act as a controller for our interface. Naturally, Controller is a good name for that class.
Just write the following lines in the file, then hit the “Save” button.
class Controller
  attr_writer :friendsTableView

  def addFriend(sender)
  end
end
The attr_writer
call as you know will define a setter method for the @friendsTableView
instance variable. Cocoa will call this method when the application
starts and the table view we created in Interface Builder will be
available as the @friendsTableView
instance variable. In the Interface Builder jargon, this is called an outlet
.
Then, we define an empty addFriend
method. We want this method to be called when the user presses the “Add” button. Interface Builder calls this an action
.
NOTE
: the addFriend
method
must have only one argument, which will be the button itself. Also, in
order to see the method in Interface Builder, the argument must be
named “sender”. This is a convention requirement.
Now that the class is written we need to import it in our interface. Let’s go back to Interface Builder. From the Library panel, drag-and-drop an NSObject object to the MainMenu.nib window. Then, in the Inspector, click on the next-to-last tab and in the “Class” popup list select “Controller”, as shown in Figure 13. By doing this, when your application starts, Cocoa knows to create an instance of the Controller class—as with any other user interface objects that we previously set up in the window.
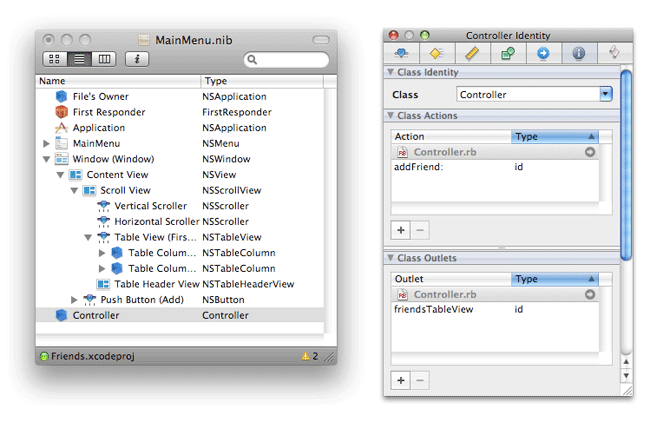
Figure 13: Inspecting the Controller
As you can see, Interface Builder is aware of the class we just wrote in Xcode. It also recognized addFriend
as an action and friendsTableView
as an outlet.
NOTE
: if Controller does not appear in the list, double-check the code in the Controller.rb
file. Also, verify that the file was saved before switching to Interface Builder.
Now we need to establish connections between the Controller object and the user interface elements.
In the MainMenu.nib window, do a right-click on the Controller object (or press the control key and do a single click) and you should see a new panel that lists the actions and outlets for this class, as shown in Figure 14. The empty white circles at the right mean that they are not connected yet. Let’s fix that now.
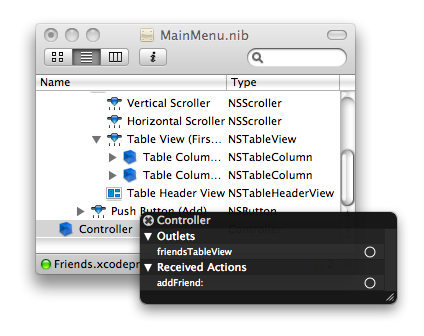
Figure 14: The Controller, Disconnected
Start by clicking on the white circle next to the friendsTableView
outlet, then press the mouse button on and drag a line to the table view object just above. Do the same thing for the addFriend
action, connecting it to the button object. You should then see what is shown in Figure 15:
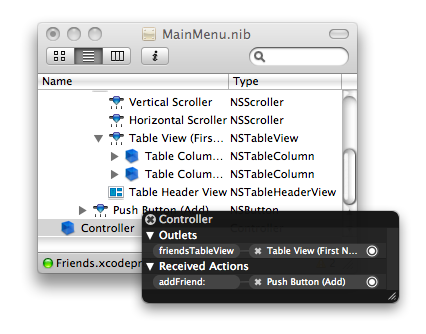
Figure 15: The Controller, Connected
Congratulations, our Controller class is now properly integrated with the user interface. We can save and go back to Xcode.
The first thing we want to do is to define an awakeFromNib
method in our class. This method part of the NSNibAwaking
protocol will be called by Cocoa when our class is instantiated from
the nib file, so a little bit after when the application starts. When
this method is called, we are guaranteed that outlets are propertly set.
class Controller
  # ...

  def awakeFromNib
    @friends = []
    @friendsTableView.dataSource = self
  end

  # ...
end
Here we set up an new array that will contain the list of our friends. Then, we call the setDataSource
method on the table view to set ourselves as the data source. MacRuby provides a nice convenience helper here, by translating dataSource=
to setDataSource
, but you can also call the later if you prefer.
For convenience purpose we will also create a Friend class. You can either copy and paste the following snippet in the Controller.rb
file, or in a new file, Friend.rb
for example. If you opt for the later, you do not need to require the Friend.rb
file, remember that rb_main.rb
will do it for you.
class Friend
  attr_accessor :first_name, :last_name
end
If you click on “Build and Run”, you will see that our application starts, but with the following lines in the Xcode console (click on the “Run” menu item, then “Console” to make it appear):
2008-09-11 15:00:48.602 Friends[18379:10b] *** Illegal NSTableView data source
(<Controller: 0x10ab850>).  Must implement numberOfRowsInTableView: and
tableView:objectValueForTableColumn:row:
Do you remember this NSTableDataSource informal protocol that we discussed earlier? We need to implement it in our Controller class, so that we can feed the table view with data.
class Controller
  # ...

  def numberOfRowsInTableView(view)
    @friends.size
  end

  def tableView(view, objectValueForTableColumn:column, row:index)
    friend = @friends[index]
    case column.identifier
      when 'first_name'
        friend.first_name
      when 'last_name'
        friend.last_name
    end
  end

  # ...
end
The first method just returns the number of elements in our @friends
array.
The second one is a little bit trickier. We need to return data for the given column and row. In Interface Builder we properly provided identifiers for every column, so here we just retrieve the identifier of the given column and appropriately return either the first or last name from the friend at the given row.
Now we properly implemented the required data source methods, but our model is still empty. We need to change the addFriend
method to actually do something.
class Controller
  # ...

  def addFriend(sender)
    new_friend = Friend.new
    new_friend.first_name = 'John'
    new_friend.last_name = 'Smith'
    @friends << new_friend
    @friendsTableView.reloadData
  end

  # ...
Here we just create a new Friend object, set the first and last names to a predefined value, then append the object to our @friends
array. But this is not enough, we need to tell the table view that the data source changed, so that it can reload the data.
Hitting “Build and Run”, our app should behave as expected. Clicking 3 times on the “Add” button should reveal what is shown in Figure 16:

Figure 16: Friends.app, Adding Items
Now, if you try to actually edit one of the columns of a given row, by double-clicking on it, you will see that your change will not be taken into account by the view after the editing. Hitting the enter key will ignore your change and display the old value.
This is because the table view has no way to change our @friends
array, yet. To feature editing, we need to implement another method part of the data source informal protocol.
// Set the data object for an item in a given row in a given column.

- (void)tableView:(NSTableView *)aTableView setObjectValue:(id)anObject
        forTableColumn:(NSTableColumn *)aTableColumn
        row:(NSInteger)rowIndex
So, let’s do this.
class Controller
  # ...

  def tableView(view, setObjectValue:object, forTableColumn:column, row:index)
    friend = @friends[index]
    case column.identifier
      when 'first_name'
        friend.first_name = object
      when 'last_name'
        friend.last_name = object
    end
  end

  # ...
end
We can now verify after building the project that our table view handles editing:
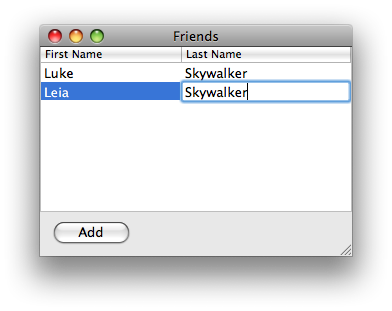
Figure 17: Friends.app, Editing Items
Congratulations, the application is complete!
Next Steps
Here are some exercises for you to consider:
- Add a few more fields, for example “Phone Number” or “Email Address”.
- Add a “Remove” button that deletes the selected row(s) out of the view.
- Implement a save and load feature using the builtin Ruby CSV library.
- Allow the user to select contacts from his address book as friends, using the AddressBook framework APIs.
Conclusion
Writing Cocoa applications using Ruby is not only possible, but also very easy and performant, thanks to MacRuby and its tighter integration with the Mac OS X core technologies.
MacRuby is still a project in development, but it is growing very quickly. Make sure to track the progress by following the MacRuby blog .
Posted:
2008-10-17
FROM
http://developer.apple.com/mac/articles/scriptingautomation/cocoaappswithmacruby.html


发表评论

-
一个脚本×关键词“百度说吧”你懂的
2010-09-19 22:06 1679很久没更新但还是陆续� ... -
Redmine with Gmail
2009-11-20 18:50 953折腾了很久,终于解决. 升级 redmine to 0 ... -
Rails 响应 content-type 请求出错
2009-07-30 10:28 1219昨晚使用rails 2.3.2 做测试服务器,结合iphone ... -
activeRecord delete by date time
2009-07-08 11:12 931根据时间删除数据。 Articl ... -
介绍Ruby On Rails
2009-05-22 17:14 1268===转至 http://kiwi.csie.chu.edu. ... -
毕业设计 preview
2009-05-16 21:51 752Pluto CMS 基本上差不多了。 希望能通过答辩。 题目决 ... -
干004 子标题同下
2009-05-12 20:42 846Rails Suck !!!! 昨天困惑了一晚上,甚至以为自己 ... -
干003 连续撞车事件
2009-05-07 00:12 812先是在之前文章中的 template 撞车后 现在每次都是小心 ... -
Embeded Blocks for Rails Erb
2009-05-01 17:49 886費了幾乎兩個小時搞定這問題。很干 不過也終於解開個超級大謎團, ... -
這樣設計ROUTES規則可以不
2009-04-30 14:37 833覺得controller裡面文件有點亂,想通過建目錄來解決。 ... -
rails 2.3 的一個 bug?
2009-04-30 01:53 752class ForumPost < ActiveReco ... -
方便debug的rails插件 rails-footnotes
2009-04-29 22:52 1111起源於今天添加返回到之前頁面功能,用session實現,並加到 ... -
Trapped In Ruby on Rails Reserved Words
2009-04-27 00:25 878今天偷懒,也顺便试试能否通过 scaffold 来生成 cms ... -
RAILS I18N
2009-04-18 18:48 1161官方文章 Rails Internationalization ... -
震精!不是漏洞的漏洞
2009-04-18 12:38 0讓我們看下面的代碼: MODEL 用戶對應多條項目 ... -
Rails Tricks #2
2009-04-18 01:41 800个人摸索的一点点经验 Layout 如果 ... -
如何給Rails 寫插件
2009-04-16 15:11 880很簡單。備忘。 1 生成代碼 script/genera ... -
rake 常用命令
2009-04-14 22:11 1504rake db:abort_if_pending_migrat ... -
ruby爬虫 以及在ruby中通过ActiveRecord使用数据库
2009-04-14 22:02 1512今天写了个挺好玩的东西,看着数据库里面满满的数据,别提多开心了 ... -
Rails Tricks #1
2009-04-14 12:21 759《Agile Web Develop》这本书里面只是简单介绍了 ...
相关推荐
苹果下macruby开发, 你懂得,新书
macruby.github.com MacRuby 主页
MacRuby的 注意:由于 Apple 放弃了 MacRuby 严重依赖的 Objective-C 垃圾收集器 (libauto),MacRuby 的未来开发无限期中断。 如果您想为 iOS 和 OS X 开发应用程序,请查看 MacRuby 项目的精神继承者 RubyMotion。...
Macruby In Action
im姆 使用制作的Mac版IME。 它表明您可以使用数百行Ruby来制作实用级别的IME。 只能进行简单转换,但可以直接使用 您可以使用Interface Builder轻松更改外观 可以在Ruby中轻松更改转换算法和IME行为 ...
需要安装macruby: : (我打算以后重写服务器是obj-c) 将 osx-org-clock-menubar.el 添加到您的加载路径并加载它(add-to-list 'load-path " /path/to/folder/containing/elisp/file/ " ) (load-library 'osx-org-...
#Ichabod 使用无头版本的WebKit从命令行运行JavaScript测试。... ##安装 $ macgem install ichabod或者,如果您使用的是rvm: $ rvm use macruby$ gem install ichabod用法 ichabod ./your/file.htmlichabod ...
不支持macruby扩展 仅支持格式 仅支持Ruby> = 2.5 知名用户: -通过突变测试的代码审查引擎。 -Ruby语法反向移植。 可能还有其他。 (如果您希望在此处提及您的工具,请使用用例的TLDR对附加内容进行PR)。 ...
Objective-C和MacRuby / RubyMotion中的原始实现已移植到Swift。 Guigna并没有掩盖编译开源软件的复杂性:它在可以监视和中断的Terminal窗口中启动Shell命令。 当需要管理特权或其他输入时,由于脚本桥,可以直接在...
我已经在 1.9.3、1.9.2、1.8.7、MacRuby 0.10、JRuby 1.6.4 和 rbx-head、YMMV 上测试了 Pinch。 规格目前在 MagLev 上爆炸。 安装 gem install pinch 用法举例 require 'pinch' data = Pinch . get '...
适用于Grand Central Dispatch的MacRuby绑定 ,基于线程的,放弃的 请注意,promise.rb可能不是线程安全的。 安装 将此行添加到您的应用程序的Gemfile中: gem 'promise.rb' 然后执行: $ bundle 或将其自己安装...
一个Mac应用程序(用MacRuby编写),允许用户用英语编写正则表达式的定义,然后将其转换为ruby正则表达式,该表达式也可以用最少的修改就可以在其他语言中使用。
命中列表开始菜单 一个 OS X 菜单栏应用程序在列出了今天的所有任务,并在单击任务标题时启动计时器。 需要 OS X 10.9+ 申请许可证 用 Swift 编写 MacRuby 中的 RubyMotion 中的